
Kimi K3 is one of the most powerful open-weight models available, and since the weights went public you can now run it locally. In this guide, you'll learn:
- What Kimi K3 is
- How to run Kimi K3 — locally and on rented GPUs
- How much it costs to run Kimi K3
I'll also cover some of the common issues you might run into during setup, based on my own experience.
What is Kimi K3?
Kimi K3 is an open-weight Mixture-of-Experts (MoE) language model developed by Moonshot AI and designed for coding and long-horizon agentic tasks. The Kimi K3 release date was July 16, 2026, when Moonshot AI opened API access. Kimi K3 open weights were then published on July 26.
As of 2026 Kimi K3 is the largest open weights model from Moonshot AI. Kimi K3 main specs:
- 2.8 trillion total parameters
- 1 million-token context window
- 104 billion active parameters per token
- 896 experts
Unlike most large language models, which are typically released in full precision and later quantized by the community, Kimi K3 is distributed in its native MXFP4 format. The expert weights are stored in 4-bit precision, while the attention layers and shared experts remain in BF16.
Moonshot AI trained the Kimi K3 model using quantization-aware training beginning with the supervised fine-tuning stage, making the 4-bit weights the model's original release. To learn more about these formats, see our guide to GGUF and quantization.
Long-context inference is made more efficient through Kimi Delta Attention, a new attention mechanism designed to reduce computational costs compared with the previous generation. In addition, Kimi K3 operates with reasoning permanently enabled.
Kimi K3 benchmarks
The table below compares Kimi K3 with other frontier models:
| Model | Intelligence Index | GDPval-AA v2 Elo | Open weights |
|---|---|---|---|
| Claude Fable 5 | 60 | 1760 | No |
| GPT-5.6 Sol | 59 | 1712 | No |
| Kimi K3 | 57 | 1668 | Yes |
| Claude Opus 4.8 | 56 | 1600 | No |
| GLM-5.2 | 51 | 1514 | Yes |
| GPT-5.5 | 50 | 1494 | No |
| Qwen 3.7 Max | 46 | 1442 | Yes |
| DeepSeek V4 Pro | 44 | 1408 | Yes |
| MiniMax M3 | 44 | 1396 | Yes |
| Gemma 4 31B | 39 | 1284 | Yes |
At the time of writing, Kimi K3 is fourth on the Intelligence Index — behind Claude Fable 5 but ahead of Opus 4.8, which is very impressive for a model you can run locally. The Kimi K3 vs GPT-5.5 gap is the more striking one for anyone weighing a self-hosted setup against a subscription: K3 scores 57 against 50, and it's the open-weight side of that pair.
What's more, in Frontend Code Arena, a benchmark that ranks models based on blind developer testing, Kimi K3 overtook Claude Fable 5 with a result of 1679 points.
How to run Kimi K3 locally
Without further ado, let's talk about running Kimi K3 on your machine. I'll walk you through two ways to do this:
- Using Atomic Chat
- Using a rented GPU
Kimi K3 is a frontier-class model, and most people don't have the hardware to run it at home, but nevertheless there are ways to launch your own instance.
If you're looking for a model that runs comfortably on consumer hardware, see our guide to the best local LLMs for coding, which covers models sized for laptops and desktops.
How to run Kimi K3 in Atomic Chat
First, let's talk about the simplest way to run Kimi K3, but also one that requires you to have access to data-center level hardware.
Let's explore how to run Kimi K3 in Atomic Chat. Atomic Chat is a free open source desktop application we've built that downloads open models from Hugging Face and runs them locally. It's the same app you'd use to run local LLM builds of any size — the only thing that changes with K3 is how much hardware sits behind it.
Note the hardware requirements: The official vLLM recipe requires approximately 1680 GB of VRAM to serve Kimi K3. To run it on your own hardware, you'll need approximately 8× B300 NVIDIA GPUs:
| Configuration | VRAM | Serves Kimi K3 |
|---|---|---|
| RTX 5090 | 32 GB | No |
| 8× H200 | 1128 GB | No |
| 8× B200 | 1467 GB | No |
| 8× B300 | 2149 GiB | Yes |
Step 1 — Install Atomic Chat
Download Atomic Chat and install the build for your platform:
- macOS — a universal
.dmgfor Apple Silicon - Windows — an
.exeinstaller for x64 - Linux — a self-contained
.AppImagefor x86_64, no root needed - iOS — through the App Store
- Android — through Google Play
Step 2 — Find Kimi K3 in the catalog
Open the Models tab and search for kimi k3.
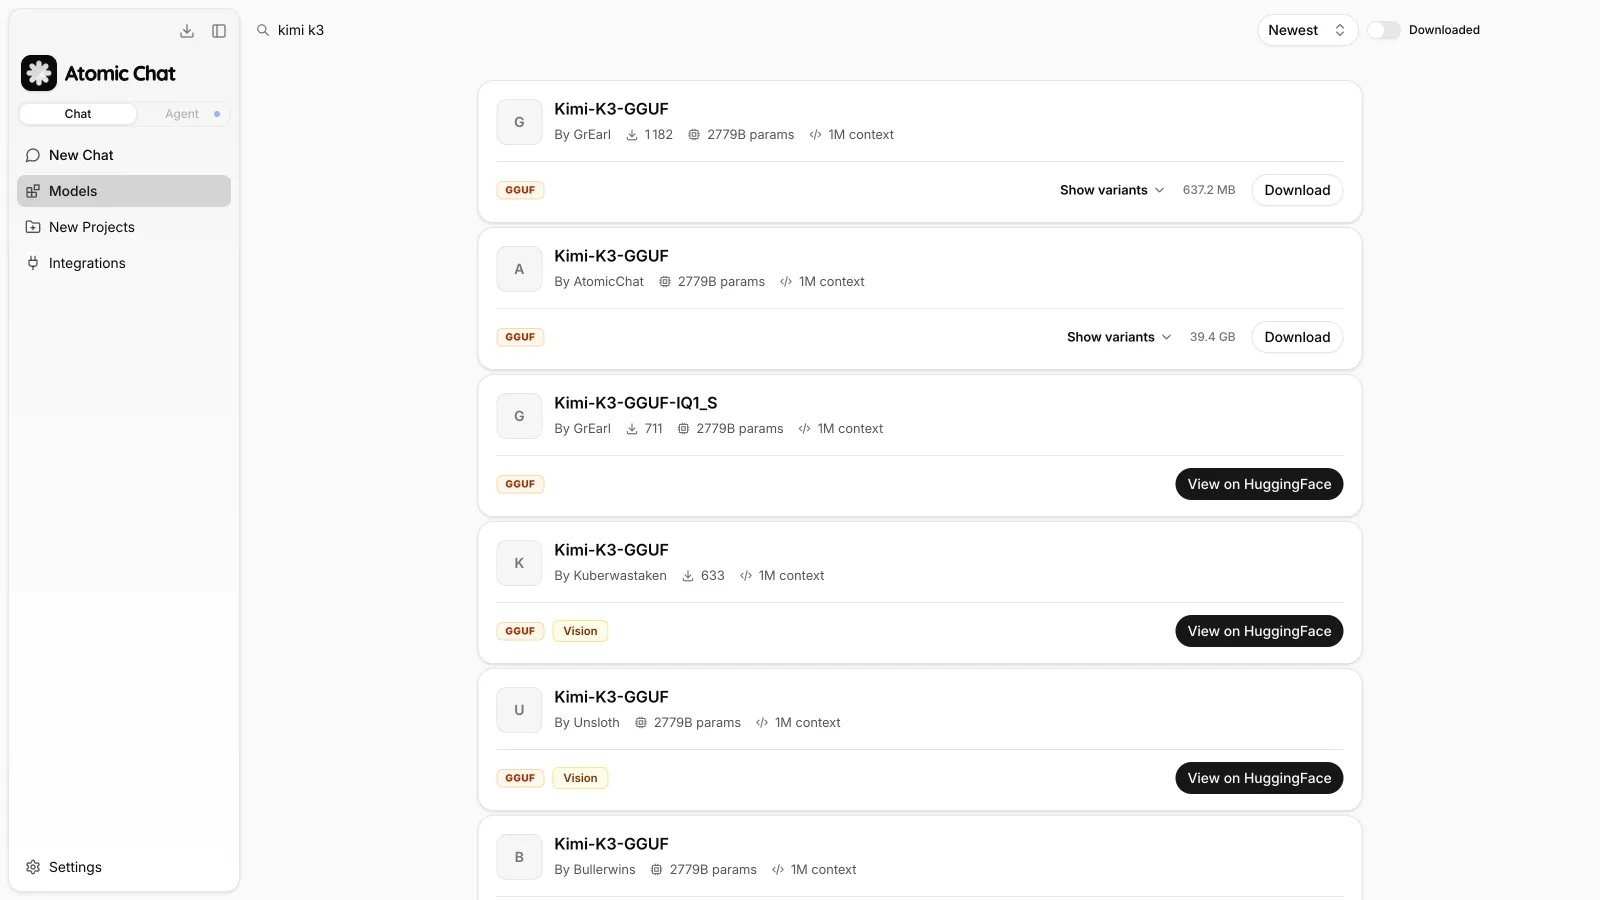
The catalog is backed by Hugging Face and includes the GGUF conversions published after the weight release, among them AtomicChat, GrEarl, Unsloth, and Bullerwins.
Entries with a Download button can be pulled from within the app. Entries with View on HuggingFace open the repository instead.
Step 3 — Download the model
Click Show variants to list the files in a repository.
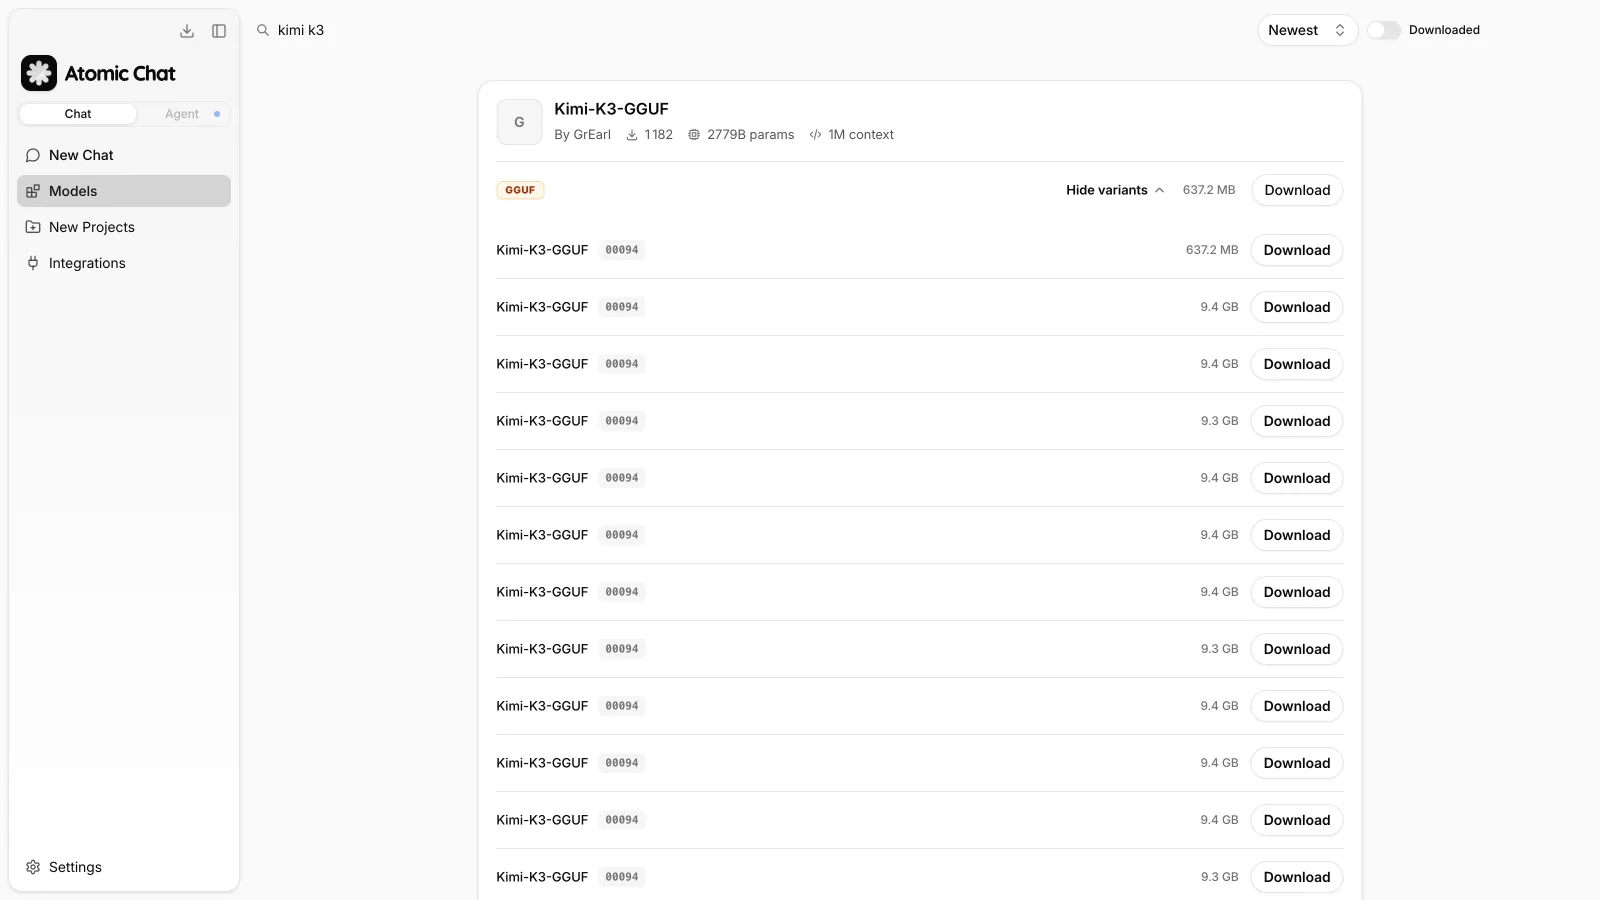
The 00094 marker on each row indicates the file is one of 94 shards, each roughly 9.4 GB. All shards belong to a single quantization.
| Build | Total size | Shards |
|---|---|---|
| Original MXFP4 | 1454 GiB | 96 |
GGUF IQ1_S | 528 GiB | 94 |
From here, the model will run and you'll be able to chat with it locally via Atomic Chat's built-in chat.
This isn't practical for most people, but there's another way to run your own instance of Kimi K3: renting a GPU cluster.
How to run Kimi K3 on rented GPUs
You can run an instance of Kimi K3 on rented GPUs. Several services rent out hardware for running AI models, and for this guide I'll use Vast.ai, a marketplace where individual providers list their machines by the hour.
Note: I'll be renting 8× B300, meaning eight NVIDIA B300 cards in one machine, which together provide 2149 GiB of VRAM. That's the smallest configuration that fits Kimi K3, since the model needs about 1680 GB to serve. These machines aren't always listed on the platform — the morning after my run, none were available. You can check current availability with this command:
vastai search offers 'gpu_name in [B300,GB300] num_gpus>=8 rentable=true'
Step 1 — Open the Vast console
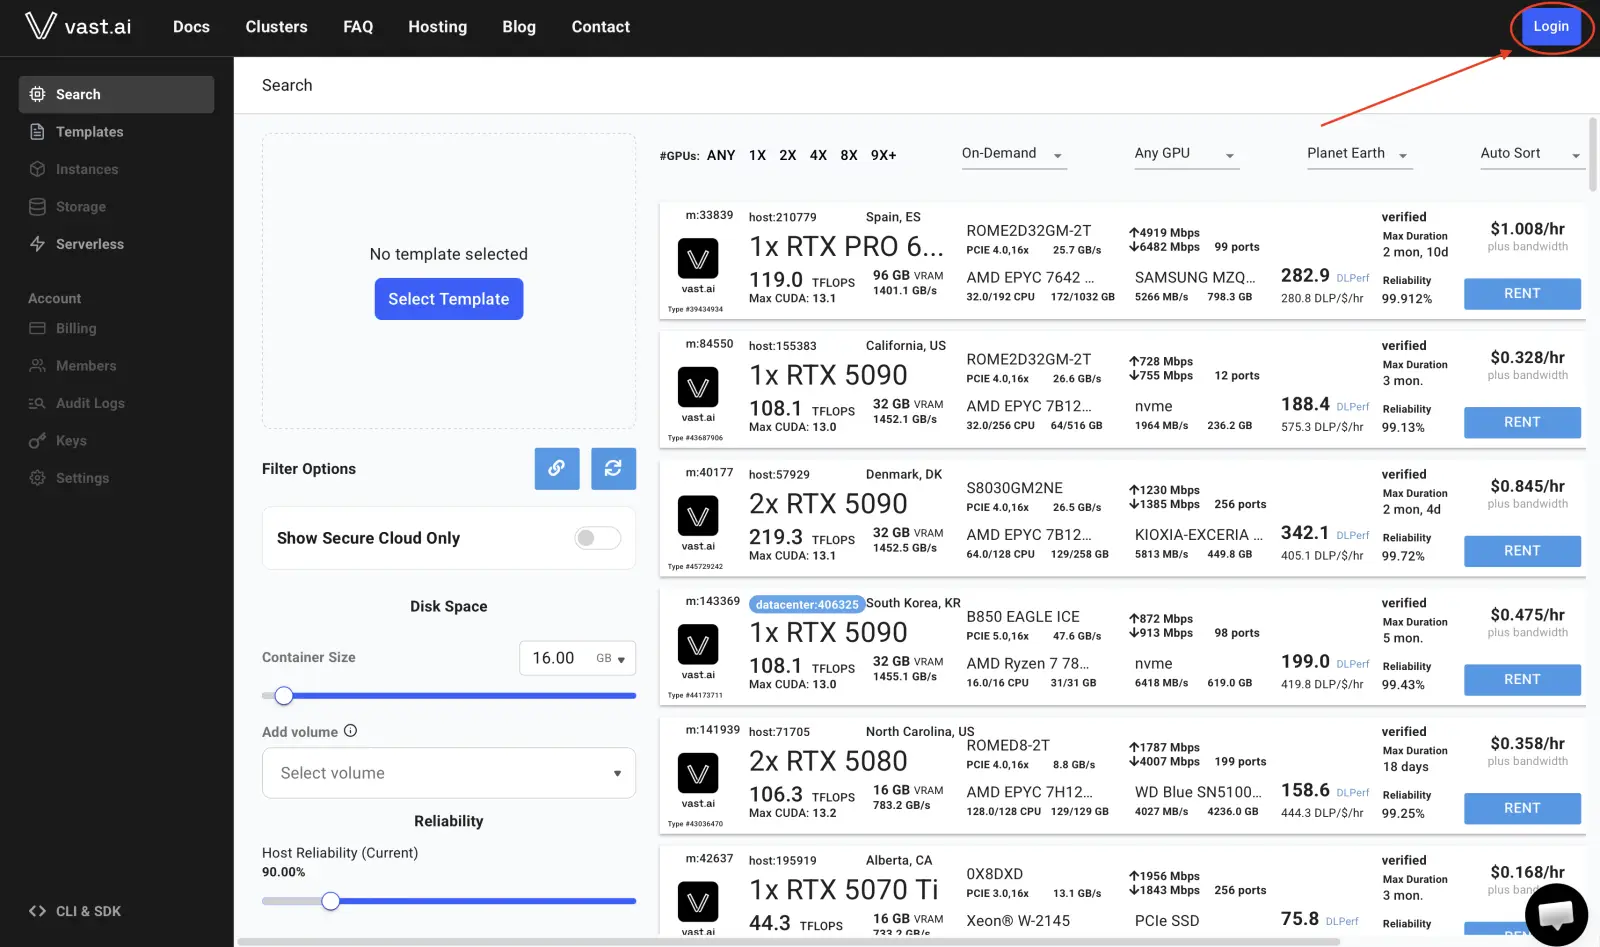
Open vast.ai and click Console.
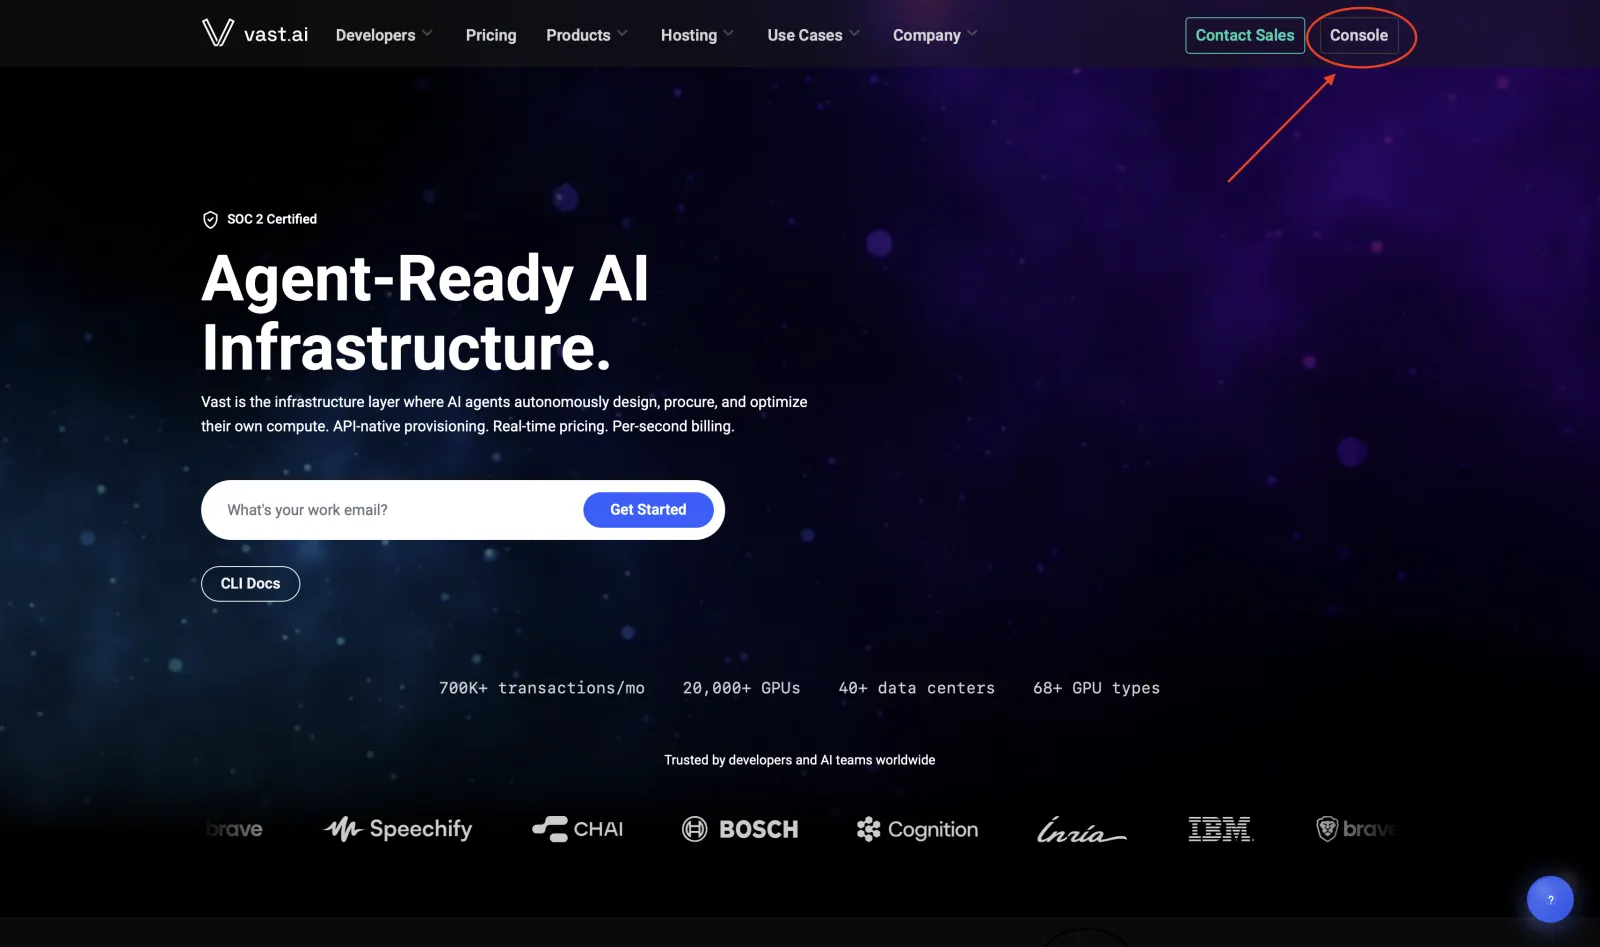
Click Login and sign in, or register an account.
Step 2 — Add credit
Open Billing in the sidebar and click Add Credit.
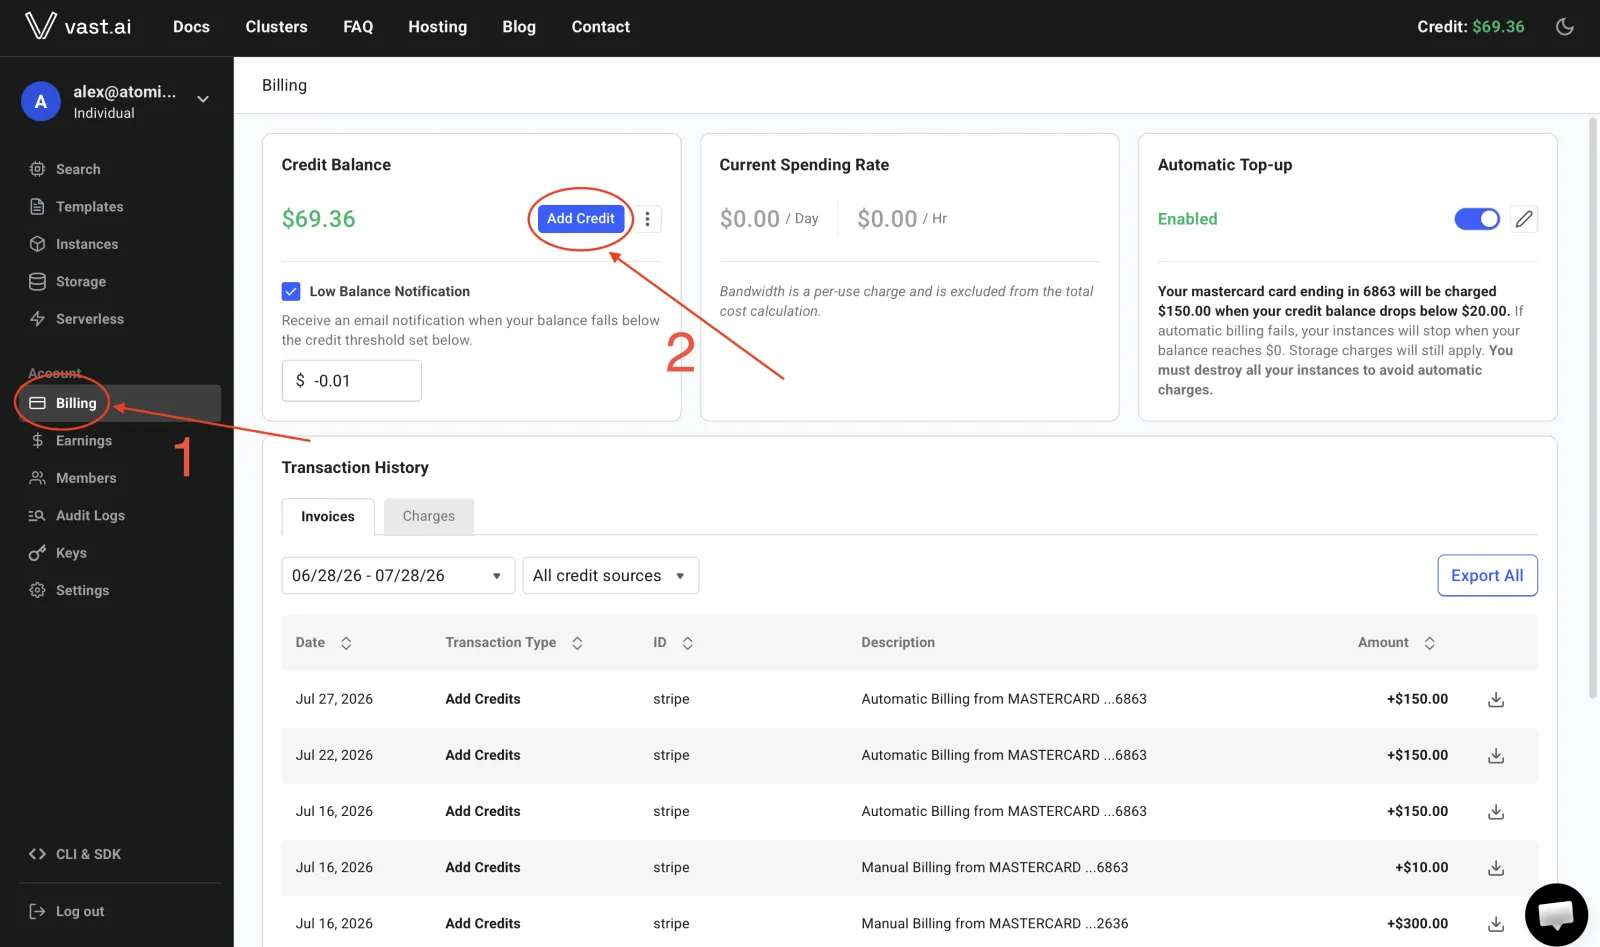
Add at least $150. Getting from an empty instance to a running model costs approximately $100, since billing starts when the instance is allocated and the 1.4 TB download runs at the full hourly rate. $200-250 leaves margin for a failed attempt.
Vast terminates all running instances when the balance reaches zero, including instances mid-download.
Step 3 — Filter for 8× B300
Open Search and set the following filters:
- #GPUs:
8X - GPU:
B300, listed under Data Center
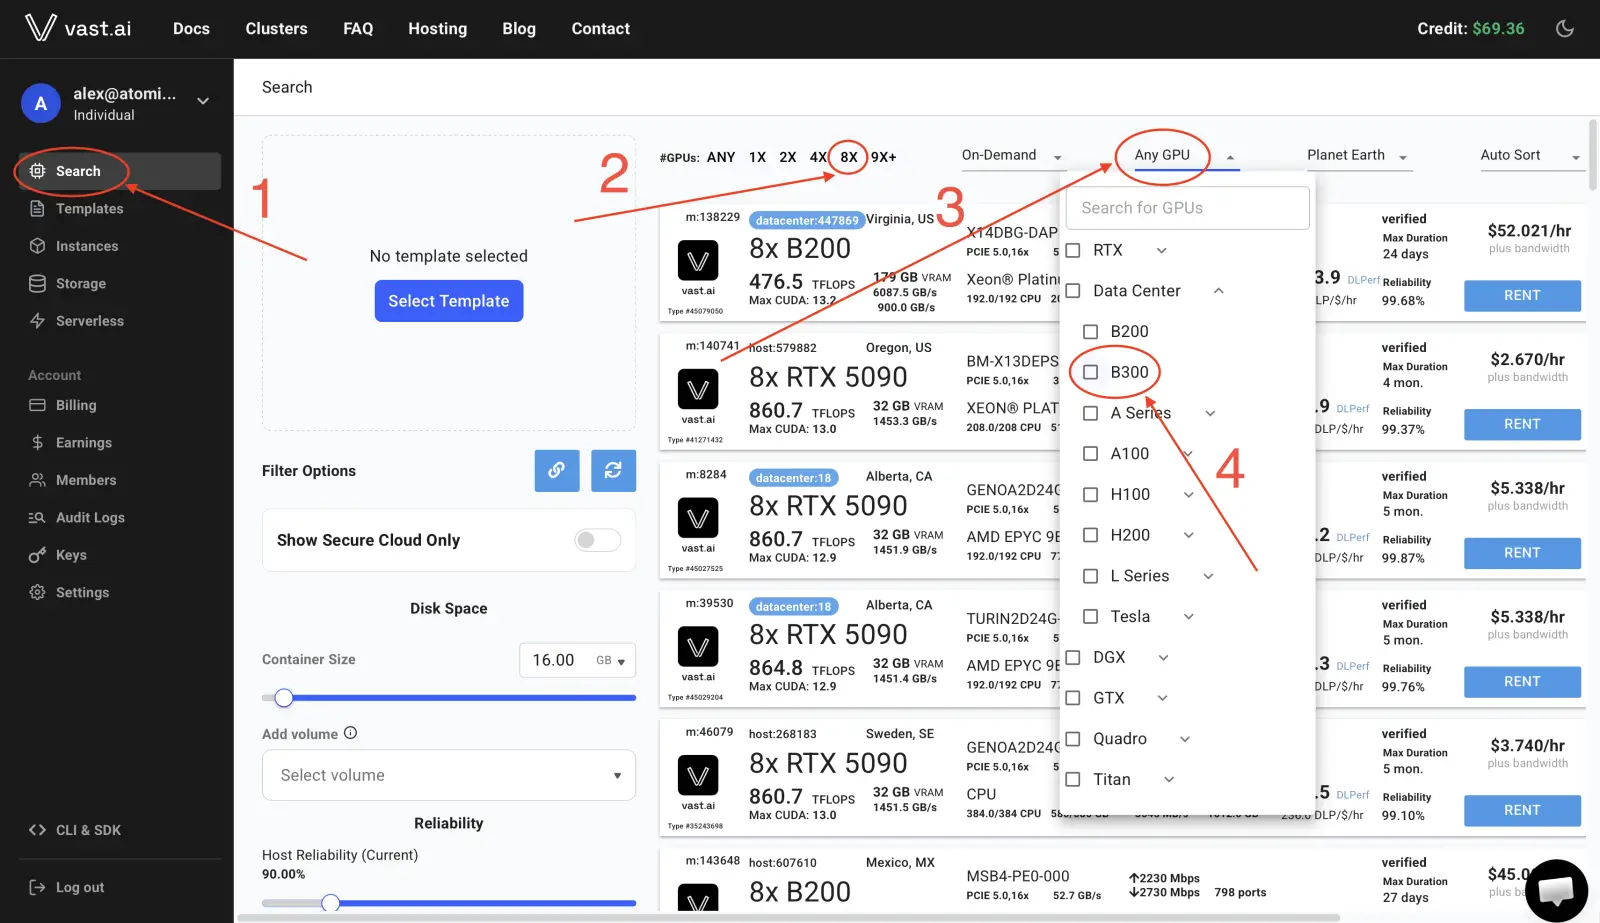
In Filter Options, set Disk Space to 1900 GB.
Step 4 — Select a template
Before creating the instance, you need to select a template.
Click Select Template.
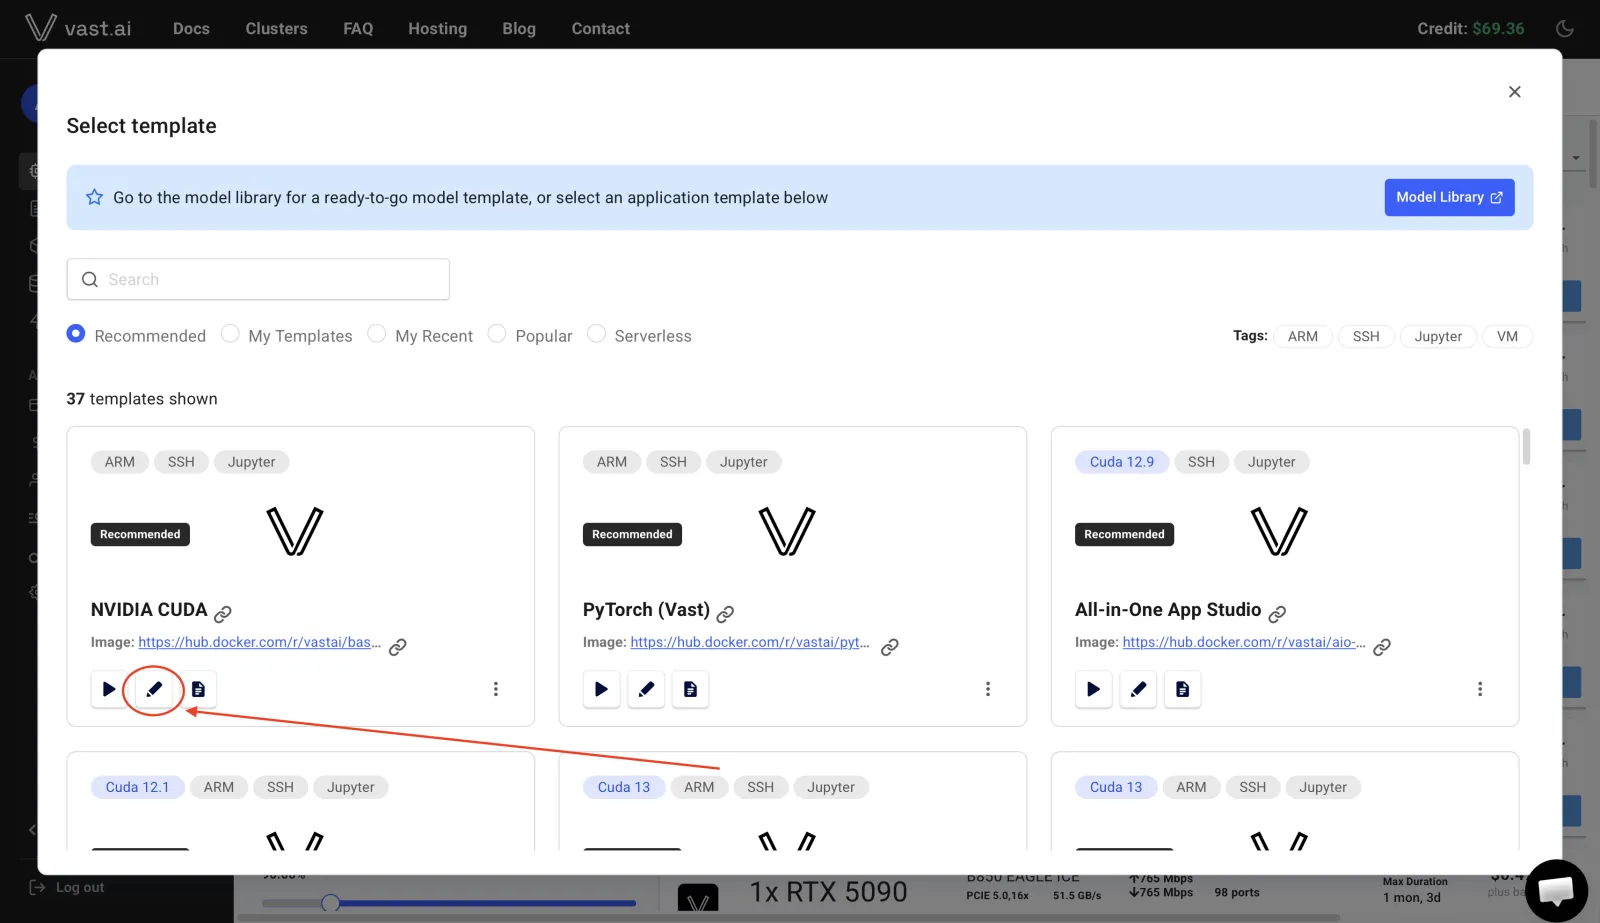
The built-in templates do not currently support the kimi-k3 image, so start from the NVIDIA CUDA template and modify it instead of using it directly. Click the Edit (pencil) icon.
Step 5 — Configure the template
In Edit Template, configure the following settings.
Image
Set:
- Image:
vllm/vllm-openai - Tag:
kimi-k3
The kimi-k3 tag is currently available only in the nightly vLLM image.
Wait until Vast displays the green Image found confirmation before continuing.
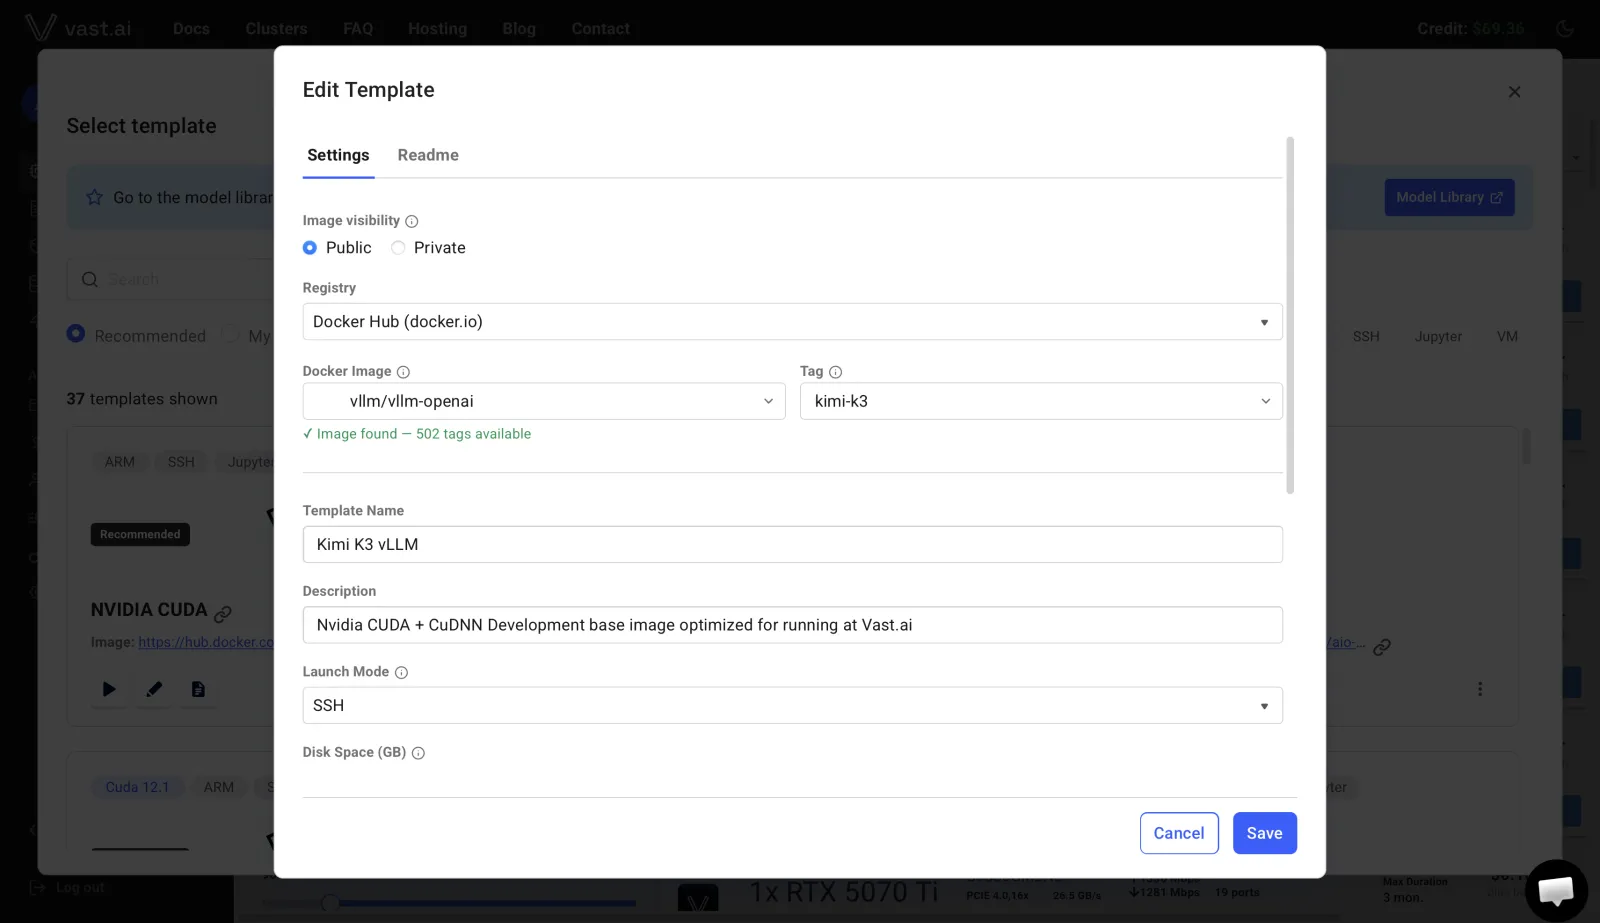
Launch Mode
Set Launch Mode to SSH.
SSH mode starts a minimal instance without the default Jupyter configuration, which isn't needed for this setup.
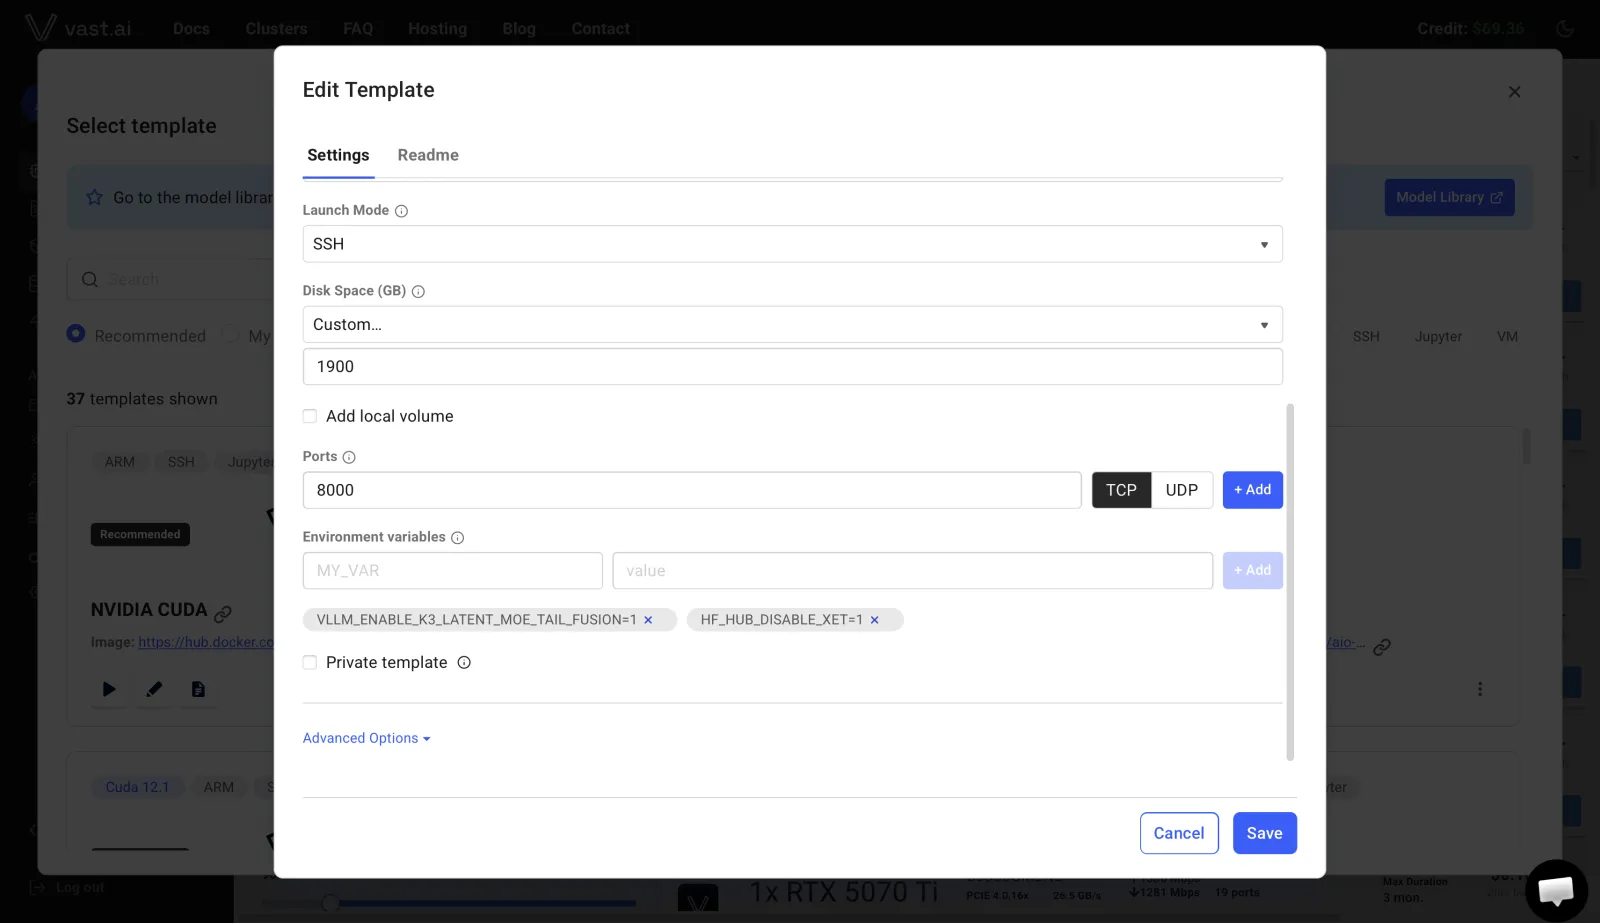
Disk Space
Set Disk Space to 1900 GB.
The Kimi K3 model requires approximately 1.9 TB of local storage. Smaller disks will run out of space during the model download.
Ports
Remove the default Jupyter ports and add a single port:
| Port |
|---|
8000/TCP |
Environment Variables
Remove all existing environment variables and add the following:
| Variable | Value |
|---|---|
VLLM_ENABLE_K3_LATENT_MOE_TAIL_FUSION | 1 |
HF_HUB_DISABLE_XET | 1 |
On-start script
Under Advanced Options, paste the following into On-start script, replacing the example SSH public key with your own:
#!/bin/bash
PUB="ssh-ed25519 AAAA...YOUR_PUBLIC_KEY... user@host"
(for i in $(seq 1 60); do
  mkdir -p /root/.ssh
  grep -qF "$PUB" /root/.ssh/authorized_keys 2>/dev/null || echo "$PUB" >> /root/.ssh/authorized_keys
  chown -R root:root /root/.ssh
  chmod 700 /root/.ssh
  chmod 600 /root/.ssh/authorized_keys
  sleep 3
done) &
(apt-get update -qq && apt-get install -y -qq aria2 jq) >/tmp/apt.log 2>&1 &
date +%s > /root/box_start_ts
The vllm/vllm-openai:kimi-k3 image resets the permissions on /root/.ssh/authorized_keys, causing SSH authentication to fail with:
Permission denied (publickey)
The startup script restores the required permissions during boot and installs the utilities used later in this guide.
Step 6 — Rent as interruptible
Return to Search, locate the instance, and click Rent.
Set the rental mode to Interruptible and enter a bid above the listed min_bid.
Interruptible instances are allocated by auction: a higher bid from another user takes the machine. Bidding close to min_bid results in being outbid. I started at $45, was outbid, and secured the instance at $85.
On-demand rentals fail with:
Invalid GPU price: Total GPU price of $280.00/hr >= max of $128.0/HR
Accounts without a linked payment card have a $128/hour limit, and the check evaluates the price of the full machine, 32 cards at $280. Interruptible bids are not subject to this check.
Renting from the CLI
The same rental can be created from the command line:
pip install vastai
vastai set api-key <YOUR_KEY>
vastai create instance <OFFER_ID> \
  --image vllm/vllm-openai:kimi-k3 \
  --disk 1900 --ssh --direct \
  --onstart onstart.sh \
  --bid_price 90
<OFFER_ID> comes from the search command above. onstart.sh contains the startup script from Step 5.
The API returns {'success': False, 'new_contract': ...} on success. The contract is created despite the False value.
Check the instance status until it reports running:
vastai show instances
Then retrieve the connection details:
vastai show instance <INSTANCE_ID> --raw | python3 -c "
import json,sys; i=json.load(sys.stdin)
print('ssh -p', i['ssh_port'], 'root@'+i['ssh_host'])
"
Step 7 — Download the weights and start the server
Connect to the instance using the address from the previous step:
ssh -p <PORT> root@<HOST>
The remaining steps run over SSH. Vast provides no browser terminal in SSH launch mode.
Build the file list
Generate the list of weight files to download:
export HF_HUB_DISABLE_XET=1
mkdir -p /data/k3
python3 - <<'PYEOF' > /tmp/k3_files.txt
import json, urllib.request, re
repo = "moonshotai/Kimi-K3"
url = f"https://huggingface.co/api/models/{repo}/tree/main?recursive=true"
cursor, files = None, []
while True:
    u = url + (f"&cursor={cursor}" if cursor else "")
    with urllib.request.urlopen(u) as r:
        files += json.load(r)
        link = r.headers.get("Link") or ""
    m = re.search(r"cursor=([^&>]+)", link)
    cursor = m.group(1) if m else None
    if not cursor: break
for f in files:
    if f["type"] != "file": continue
    print(f"https://huggingface.co/{repo}/resolve/main/" + f["path"])
    print("  out=" + f["path"])
PYEOF
grep -c resolve /tmp/k3_files.txt
The Hugging Face API paginates results. The cursor parameter is required, otherwise only the first 50 files are returned.
The final command should output 118.
Download the weights
Start the download inside a tmux session:
tmux new-session -d -s dl "aria2c -i /tmp/k3_files.txt -d /data/k3 \
  -j 20 -x 1 -s 1 --continue=true --auto-file-renaming=false \
  --console-log-level=warn --summary-interval=20 \
  --lowest-speed-limit=5M 2>&1 | tee /root/dl.log"
-j 20 downloads twenty files concurrently and -x 1 uses a single connection per file. Hugging Face returns 403 for multi-segment requests, so concurrency has to come from parallel files. Running under tmux keeps the download alive after the SSH session closes.
Monitor progress
tail -3 /root/dl.log | grep "#"
R1=$(cat /sys/class/net/eth0/statistics/rx_bytes); sleep 10
R2=$(cat /sys/class/net/eth0/statistics/rx_bytes)
echo "$(( (R2-R1)/10/1048576 )) MiB/s"
ls /data/k3/*.aria2 2>/dev/null | wc -l
du reports the full 1453 GB immediately because aria2 preallocates the files, so use the network counters instead. The download is complete when no .aria2 files remain.
Start the server
cat > /root/serve_k3.sh <<'EOF'
#!/bin/bash
export VLLM_ENABLE_K3_LATENT_MOE_TAIL_FUSION=1
vllm serve /data/k3 \
  --served-model-name moonshotai/Kimi-K3 \
  --trust-remote-code \
  --tensor-parallel-size 8 \
  --load-format fastsafetensors \
  --moe-backend auto \
  --gpu-memory-utilization 0.95 \
  --no-enable-flashinfer-autotune \
  --language-model-only \
  --reasoning-parser kimi_k3 \
  --max-model-len 65536 \
  --max-num-seqs 8 \
  --host 0.0.0.0 --port 8000 \
  2>&1 | tee /tmp/vllm.log
EOF
tmux new-session -d -s serve "bash /root/serve_k3.sh"
--max-model-len is set to 65536 because the default 1M context allocates the entire KV cache.
Loading takes approximately nine minutes. During loading the log stops and prints the following once a minute:
No available shared memory broadcast block found in 60 seconds
This is CUTLASS compiling kernels for Blackwell.
Step 8 — Connect and verify
Forward the API to your local machine:
ssh -f -N -L 8798:localhost:8000 -p <PORT> root@<HOST>
curl -s http://localhost:8798/v1/models
The model is served over an OpenAI-compatible endpoint at http://localhost:8798/v1. Send a test request:
curl -s http://localhost:8798/v1/chat/completions \
  -H "Content-Type: application/json" \
  -d '{"model":"moonshotai/Kimi-K3",
       "messages":[{"role":"user","content":"Say hello in one short sentence."}],
       "max_tokens":256,"reasoning_effort":"low"}'
Measurements from my run on 8× B300:
| Metric | Result |
|---|---|
| Generation, single stream | 104-105 tok/s |
| Prefill | 202 tok/s |
| Time to first token | 1.2 s |
| Weights per card | 191.74 GiB |
Controlling reasoning output
Kimi K3 reasons on every request and reasoning_effort defaults to max. On complex prompts this produces long reasoning traces before any output. In my testing through a public API, one prompt generated 64,000 characters of reasoning over ten minutes without returning code.
To reduce token consumption in reasoning chains:
- Set
reasoning_efforttolow - State the constraint in the prompt, for example:
reasoning budget is ZERO characters, your first token is the opening fence
With both applied, a 7.7 KB prompt produced no reasoning output and a complete 18.7 KB file in 69 seconds.
Long generations should be streamed. Non-streamed requests time out at the gateway.
Using it from a terminal
Because the endpoint is OpenAI-compatible, anything that speaks that protocol will talk to your instance once you point its base URL at http://localhost:8798/v1. That includes Moonshot's own Kimi CLI, which is built for the agentic coding workflows K3 is tuned for, as well as any generic OpenAI-compatible client. Set the base URL and pass moonshotai/Kimi-K3 as the model name — no API key is needed, since the server is yours.
Step 9 — Destroy the instance
yes | vastai destroy instance <INSTANCE_ID>
vastai show instances
Billing continues at $86 an hour while the instance exists, whether or not the model is in use.
To keep the downloaded weights for later, use vastai stop instance instead. The disk is retained at $1.32 an hour, and restarting requires winning a bid again.
Cost breakdown
The full cost of running Kimi K3 on rented hardware breaks down as follows:
| Item | Amount |
|---|---|
| Hourly rate, 8× B300 | $85-86 |
| Zero to first token | about 1 hour |
| My total run, including every mistake | $154 |
| Spent on mistakes | about $60 |
| Clean repeat following this guide | $100-120 |
The first hour breaks down as 5 minutes pulling the 15 GB docker image, 35-50 minutes downloading weights, 3 minutes loading them onto the cards, and 5.5 minutes initializing the engine and building CUDA graphs. Billing starts at the first second, so the full rate applies throughout the download.
Troubleshooting
These are the failures I actually hit during setup, and how to get past each one.
The rental is rejected with the $128/hour limit
Accounts without a linked payment method are limited to instances costing up to $128/hour. Vast applies this limit to the price of the entire machine rather than the rented GPU slice.
To work around the limit, rent the instance with a bid instead of using on-demand pricing.
A response similar to the following is expected:
{'success': False, 'new_contract': ...}Even though the request reports success: False, the contract has been created successfully.
The instance remains in loading
If an instance remains in the loading state indefinitely, the bid has usually been outbid before the host started provisioning the container. This is not caused by a slow image download.
Increase the bid and restart the instance:
vastai change bid <INSTANCE_ID> --price 95
vastai start instance <INSTANCE_ID>
SSH authentication fails
If SSH returns:
Permission denied (publickey)
the vllm/vllm-openai:kimi-k3 image has reset the ownership or permissions of /root/.ssh/authorized_keys.
The on-start script shown earlier restores the correct permissions after Vast injects the SSH key.
If the instance is already running, update the startup script and recycle the instance instead of creating a new contract:
vastai update instance <INSTANCE_ID> \
  --image vllm/vllm-openai:kimi-k3 \
  --onstart "$(cat onstart2.sh)"

yes | vastai recycle instance <INSTANCE_ID>
Pass the startup script as a string.
Hugging Face returns HTTP 403
Multi-connection downloads with commands such as:
aria2c -x 8 -s 8
do not work with the Hugging Face Xet backend. Signed download URLs are tied to specific byte ranges, so additional range requests are rejected with HTTP 403.
Download multiple files in parallel, but use a single download stream for each file.
Download progress appears incorrect
du -sh /data/k3 reports the full 1453 GB immediately because aria2 preallocates the destination files.
To monitor actual download throughput, measure the received network traffic:
R1=$(cat /sys/class/net/eth0/statistics/rx_bytes); sleep 10
R2=$(cat /sys/class/net/eth0/statistics/rx_bytes)
echo "$(( (R2-R1)/10/1048576 )) MiB/s"
Frequently asked questions
The questions that come up most often about running Kimi K3 on your own hardware.
Can you run Kimi K3 on a Mac?
No. Kimi K3 requires approximately 1.7 TB of GPU memory. The largest unified memory configuration available in Apple Silicon Macs is 512 GB, which is not enough to load the model weights. For local Mac inference, use smaller models from the Kimi family, such as Kimi-Linear-48B-A3B or Kimi-VL-A3B. Both are designed to run on Apple Silicon and are supported by Atomic Chat.
How much VRAM does Kimi K3 need?
The official vLLM configuration requires a minimum of approximately 1680 GB of VRAM. In practice, this means using 8× B300 GPUs with around 2149 GiB of total memory.
What is the difference between Kimi K3 and Kimi K2?
Kimi K3 is a significantly larger model, with 2.8 trillion parameters compared with approximately 1 trillion parameters in Kimi K2. K3 also introduces Kimi Delta Attention, which Moonshot reports can reduce long-context inference costs by up to six times. The context window has also increased to 1 million tokens. Moonshot reports that K3 provides approximately 2.5× higher intelligence per unit of compute compared with K2.
Can I run Kimi K2 locally instead?
Yes, and it's the more realistic option for most setups. K2 is roughly a third of K3's size, so people asking how to run Kimi K2 locally have a much wider range of hardware that works — quantized GGUF builds bring it within reach of a high-memory workstation, where K3 does not fit at any quantization. The process is the same one described above: pull the GGUF from the Atomic Chat catalog, or self-host Kimi K2 through vLLM on a rented machine with far fewer cards than the 8× B300 K3 demands.
Does Kimi K3 have a smaller version?
No distilled or scaled-down version of Kimi K3 has been released. Instead, Moonshot provides smaller models in the Kimi family:
- Kimi-Linear-48B-A3B — approximately 28 GB in Q4_K_M format with a 1M-token context window.
- Kimi-VL-A3B — approximately 9.8 GB.
These models can run on significantly smaller hardware than Kimi K3.
Bottom line
Kimi K3 is the most powerful open-weight model you can run as of mid-2026, but to serve it you need roughly 1680 GB of VRAM. Realistically, the best way to run your own instance of Kimi K3 in 2026 is a rented GPU cluster, such as via Vast, which costs around $86 an hour. If you're looking for models that fit consumer hardware instead, see our roundup of the best local LLM for a 16GB Mac.
Key takeaways:
- Kimi K3 has 2.8 trillion parameters with 104 billion active per token, a 1M context window.
- Moonshot launched K3 through its API on July 16, 2026, and published the weights on July 26.
- Kimi K3 is fourth on the Artificial Analysis Intelligence Index, ahead of every other open-weight model including GLM-5.2 and DeepSeek V4 Pro.
- The full K3 weights are 1454 GiB and need about 1680 GB of VRAM. To run Kimi K3 locally, you need 8× B300 GPUs.
- You can run an instance of Kimi K3 on Vast. The cost to run it is roughly $85-86 an hour, and a full run from empty account to working model cost me $154.